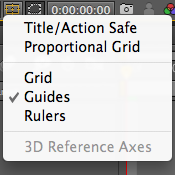
7.12.11 We had a studio work shop concentrating on the development of out five ideas but applying some technical knowledge to our story boards for example the title safe and action safe lines, we where given the session and subsequent time before the next session 8.12.11, within this session we were to crit another's work. this was particularly helpful for me as coming into the session I didn't feel confident with any of my ideas or the way I had put them down on paper, but after talking with a peer I had a little more confidence in what i was doing coming up with some really good ideas of where the project could go.
Thursday, 8 December 2011
Studio Workshop/5 Second Development
Tuesday, 6 December 2011
Time Line Studio Workshop
This is something that took me a little time to get my head around on a Tuesday morning, but it was interesting once I had got my head around it! For this session we used the the screen shots that we had gathered from a youtube clip, the took the equally spaced shots and equally spaced them along a time line, the next task was to take the significant moment shots and place them on an accurate time line correctly spaced apart.
After Effects Workshop 2
 |
| Project pain > where all the files that you may use go, like a library. |
| Time Line > Where you arrange your art work/assets. |
 |
| Composition window > where you can watch back or/and to arrange assets (specially) |
 |
| Every project must have at least one composition (similar to when creating a page in InDesign) |
 |
| Pre set PAL (UK Standard) this will set a lot of the other options, dimensions; 1050px by 576px. Frames set at PAL are 25 frames per second. |
 |
| Now there should be assets in the Project pain and more information on the time line. |
 |
| last week we only experimented with solid layers , explored key frames then animated them. |
 |
| Lowering the resolution will allow for quicker play back. |
 |
| Title and action safe guides are also available in After Effects. |
 |
| Opening files in After Effects |
 |
| When importing the default for the import will be footage, this means it will occupy one layer. After Effects will ask again how you want to import (below) |
 |
| The file will be imported into your project pain, any images or file you import are linked much like Indesign. Once imported drag and drop into composition pain. |
 |
| You may want or need to adjust the colour of the background you have the same options with the imported file as with the solid layer. |
 |
| it is also possible to have a multiple layered Photoshop document and import it into AE |
 |
| instead of importing as footage import as composition, you get all the layers when importing as a composition. |
 |
 |
| Double clicking the composition it will open in the time line with all the layers, then you can edit accordingly. |
Subscribe to:
Comments (Atom)


